Aquarelle painting - Cours Mirabeau, Aix En Provence
This step by step aquarelle painting was first published as a work in progress on the Pencil Topics site forum. The details have been edited but this page includes the main body of the description of the work process.
Below is the reference image, a photo of a busy street scene on the Cours Mirabeau in Aix En Provence.
This aquarelle painting was completed on stretched 300sm Clairfontaine Cold pressed watercolour paper..

Aquarelle painting step 1
The basics were drawn out ( freehand, not a trace) - I needed to simplify the image and tracing tends to introduce too much detail. It can mean that the shape of the picture may change slightly, but that is not a problem. I don’t have a picture of the earliest stage, unfortunately, but the next image shows the first application of colour.
My first colour stage was to mix two very thin washes of watercolour pencil, a brownish one and a greenish one, and apply a very thin set of layers to establish some of the tones. Once this was done, most of the graphite could be removed from the drawing, leaving a light indication of the shapes.
 Step 1
Aquarelle painting step 2
The next step was to apply shading with the same brand of watercolour pencils and expanding the range of colours. These layers of dry colour were then washed in with a damp brush.
I have taken some care with the lettering over the cafe front and although it isn't really crisp, I am sure that I will be able to sharpen it up later when I apply more layers of colour.
At this stage of the aquarelle painting I am not sure how many people are going to appear sitting at the tables, and it will be interesting getting the lighter chair shapes against the dark background in shadow. Still, what is life if not full of challenges?
 Step 2
Aquarelle painting step 3
We can now move on as follows:
The colour in the paving slabs has been attacked with a power eraser to lift out some of the washed in dry watercolour pencil. The eraser leaves a soft edge and this works well to simulate the dappled light coming through the leaves on the many trees along the road.
It is clear that I will need to do something about the sunlight on the box which has the notice board on it (lower right). Currently it looks as if light is coming FROM the box rather than falling on it. The photo image will need to be varied and light taken to the side of the box, and also some detail put into the lit box surface to darken it a shade. That may be the solution.
I have worked the cafe name sign up (Les Deux Garcons) to give it some depth of colour as this is a tricky part of the picture to get the lettering right. If that fails, then I don't want to have spend many hours on the rest and then have to scrap the picture! So far it isn't perfect, but it will do for the moment.
I have to decide how many people to sit in the cafe seats, and shortly, how many people to put on the footpath.
For the moment I have concentrated on those two tubs and the plants within them, to try to get the balance of light and dark elements right.
I have also started some work on the upper parts of the buildings so that I can find the tree trunks and also then put in some more foliage.
All this work is now being done in dry pencil which is washed in with a damp brush to bed the colour down. I am not looking to put in detail at the moment (apart from the sign over the café), That will come with the dry pencil later.
I did see that I had made a couple of errors, which I will explain in a minute, but otherwise the image is developing well.
 Step 3
Aquarelle painting step 4
We can now move on a little………..
Firstly, you can see that I have erased some of that flagstone shading from the right of the box. I have also shaded in the front of the box a little so it now looks less than the source of the light.
I have completed some illegible lettering on the blackboard and blocked in some diners at the tables - I may leave them as semi outlines rather than risk attracting attention to this off centre area of the picture.
Dry watercolour pencil (Caran d'Ache Supracolour) has been used in all the current stages of the picture and some of it has been carefully brushed in with a damp brush. I have brought colour into the cafe frontage and been able to increase the area of foliage from the bushes in the tubs to meet that colour. I have toned down the blue in the sign over the door, but left it blue as a contrast colour interest.
Water has been used to wash in the dry coloured pencil in the name over the cafe and also in the buildings above and dry black soluble pencil used to define the scroll work above the frontage.
This was the first error.
I should have used non soluble wax pencil for that, so that I would have kept the option to add a light colour wash to the white wall that you see above. The soluble pencil will run - wax pencil would have resisted water.
A small amount of work has been done to the sunshades and the second error was when I misjudged the line of the right hand shade against the cafe front. That top line is not right but I will leave it for now and correct later if it requires it. The lower part of the tree trunk isn't right either - the left side at the bottom is too far over to the left.
Not to worry, it is starting to look as the finished picture was in my mind when I commenced work.
Possibly the next step will be to start at the top left and do some work to the foliage on the trees.
 Step 4
Aquarelle painting step 5
I wanted to some time working on the cafe scene in Aix En Provence while at my local art society working morning. However I discovered when I arrived, that I had left the reference photo behind ! Doh ! Anyway, - who needs a reference photo ?
I decided that I could easily spend some time working over the trees in the upper left portion of the picture and work up the dappled light on the paving slabs.
I can now see that I need to punch in more darks to the foliage, but the work at the society wasn't wasted. I have drawn in some walking figures and spent some time erasing colour from the pavement area to make that more believable. The reference will now have to be used to sharpen up the details of the activity in the cafes and along the pavement, but I am pleased with the work to date.
I have worked mainly in the trees in the upper left hand side where I have used a power eraser to lift out the lines of tree trunks and also some lighter bits that could be sky seen through the leaves. I am happier with the way things are going now. We need to have more darker areas in the tree cover and I may have to lift out more areas of light and temper down that bright green with some light browns.
The error in the line of the footpath has been addressed but it does mean that the walkers are now a little on the tall side - I can see some more adjustments coming on.
 Step 5
Aquarelle painting step 6
Some of the light detail has now been punched into the tree cover - using a power eraser - and the edges of the light spots have then been shaped with a dark green pencil. This has given more contrast in the leaves and helps to brighten up the picture.
The walkers - particularly the lady in green - have added interest. The green of her outfit contrasts nicely with the more natural greens in the trees and plants.
 Step 6
Aquarelle painting step 7
I have worked over the area under the sunshades and this will have further work to be done. The green sign over the cafe has had more work ... in fact there has been a general uplift of the picture which I think has led to the sunlight on the pavement becoming more realistic.
Still quite a bit more to do, but I feel that I am now making progress and have got over the 'hump' where the artwork seems to have stalled and in danger of being left and overtaken by new ideas and fresh picture starts.
Now to the final version of the Aix en Provence cafe scene on the Cours Mirabeau. I have balanced the colour and tones of the pictures to the original, so the version you see is as good as I can get it
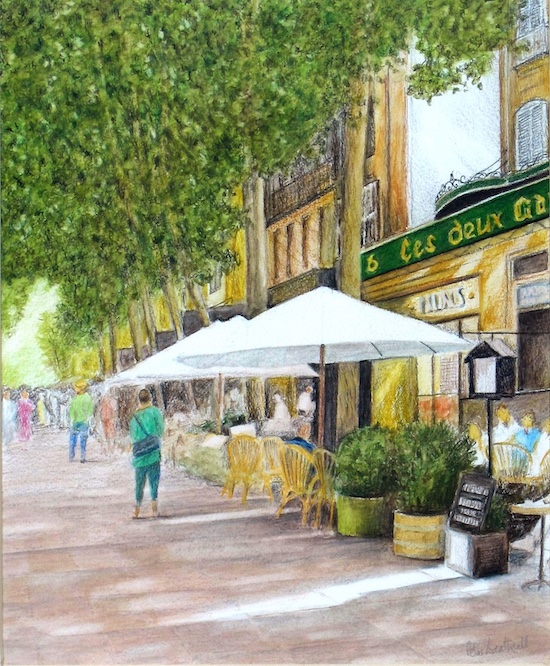 Completed aquarelle painting
I have darkened the tree foliage quite a lot with the addition of some black and also umber into the top left of the picture.
I have added more detail into the fronts of the upper parts of the buildings, and I have darkened the areas of detail in the foreground, such as the menu board and the bushes in the tubs.
I added some blue on the right to bring in a colour focus point in one of the seated figures at the table and I have also darkened the central walking figure in green.
I have signed the picture and framed it up, so this is how it will be - the temptation is always to 'fiddle' when it is still on the board, so framing forces one's hand a bit.
You might like these
Venice drawing - part 3
Part 3 of our Venice drawing in watercolour pencils. Here we start the buildings and learn about mixing colours for the scene
Gondola painting in mixed media
A walkthrough through a gondola painting in mixed media with input from Peter Weatherill
A realistic drawing of a cat: colored pencil tutorial
Tutorial - try a realistic drawing of a cat using colour pencils and learn how to draw eyes and fur texture


You might like these
Watercolour pencil tutorial - Italian Street Scene
A step-by-step demonstration showing how to create an Italian street scene using watercolour pencils from Caran d'Ache
Dartmoor landscape drawing tutorial
This landscape drawing tutorial in coloured pencils shows the Bowerman Stone in Dartmoor, Devon, UK.
How to Draw a River with Realistic Rocks in colored pencils
Learn how to draw a river with Peter Weatherill's step-by-step guide, using Faber Castell Polychromos coloured pencils and create a realistic landscape
- Home
- Step by Step Tutorials
- Aquarelle Painting
Would you like our occasional newsletter?
Home | About Us | Contact Us | Privacy Policy
Copyright Peter Weatherill and Carol Leather - 2009-2024